How to host your transactional email for free

Everyone knows that if you want to send transactional1 email you should use a dedicated service like Twilio Sendgrid, Mailgun,2 or Amazon Simple Email Service (SES). First, they’ll scale. Second, they take care of all the details you’d rather not have to think about. At the other extreme–when you’re launching the proverbial weekend project–you can plug in your Gmail account credentials and call it done.
I am not here to dissuade you from the received wisdom of the internet.
Still, in my contrarian nature3 I feel compelled to point out a middle option: you can run your own MTA (specifically an email relay). It may not be a better option for the typical app, but it offers some advantages4 all the same. This post is not about selling you on self-hosting. What it is about is showing you how much simpler it is to self-host a transactional email server than most people imagine.
tl;dr
- Run mwader/postfix-relay
- Set up DNS records for SPF, DKIM and DMARC
- Configure your app to send via postfix-relay
Don’t worry if that doesn’t make sense, it will by the end of this post.
Pre-requisites
So the title of this post advertises “for free” but here is the part where I explain the hidden asterisk. The marginal cost of hosting a transactional email server is basically free provided that you are already paying for–or otherwise have–these pre-requisites:
- Some sort of server5 that can run Docker containers
- A custom domain name
- An email provider for receiving email at your custom domain
That last one seems weird–why would you pay for a service to receive email and then host your own infrastructure for sending email? Couldn’t you just configure your app to send emails via your email provider?
The short answer is, yes! If you want an easy way to get started, by all means configure your app to send email via your email provider.6
There are reasons, however, why you may not want to rely on your email provider for too long. There are quotas, typically. You also have to worry about IP reputation. The ability of your emails to reach their destination could be impacted if your email provider is too lax about policing emails sent from other senders. Counter-intuitively, your emails can also be impacted if your email provider is too strict–at sufficient sending volume there will be complaints and as a result your account could be disabled. It doesn’t help that the needs of transactional email senders are often an afterthought for generic email providers. Finally, there are security implications. Sometimes it is hard to grant your web server access to send emails without also granting it access to be able to read all your email, which is not great, as full email access is pretty much the keys to the kingdom.7
Could you host your own email server to receive email too? Yes, but that is significantly more complicated.8
Could you skip the receiving email part and exclusively send email? Yes, this is technically feasible. However, you won’t be able to receive bounce messages and deal with them, which is a fast way to destroy your IP reputation.
Deal-breakers: Firewalls and IP Reputation
As you may have already gathered, IP reputation is everything when it comes to being able to send email and have it actually arrive at the destination. This post will cover all the ways to make your email server look as legitimate as possible. Unfortunately, there are things out-of-your-control that will stop email dead in its tracks, so let’s get the deal breakers out of the way first.
IP Reputation
Look up the public IP of your server–the one that will be running the Docker container that we’re going to send email from. (Hint: if the IP looks like 10.x.x.x or 192.168.x.x or 172.16-31.x.x, that is not a public IP, try again.)
Plug that IP into one or more of the freely available tools for checking IP reputation.9 If a single random DNS blocklist doesn’t like your IP, you might be fine, but any more and I would give up on that server–it’s not worth the trouble to set up an email server if your email will just end up in the spam folder. Maybe you’ll have better luck requesting a new server from your hosting provider, or trying a different hosting provider.
Firewalls
Some of you may be reading this post and wondering, “can I run the server from my home?” The answer is a qualified, maybe. Remember how email service providers will disable accounts that get too many complaints? Your ISP also doesn’t want to get complaints, except rather than wait for complaints, 99% of the time they use an outbound firewall to prevent all use of SMTP (the protocol for sending email) in the first place.10
It is not just residential ISPs that do this. Many server hosting providers also use an outbound firewall to prevent the use of SMTP,11 as they don’t want to deal with the complaints either.
Before going any further we need to check if your server can make SMTP connections or not. To do this, open an SSH session to your server–it doesn’t really matter if you SSH into the host itself or a Docker container or whatever, so long as it uses the same IP for outbound connections it will be a good test.
Next, look up the mail server hostname of a server to test against. I suggest you use gmail.com. Currently it resolves to:
gmail-smtp-in.l.google.com
But you should double check in case it has changed.
Finally, use netcat (nc)12 to attempt to open an SMTP connection to the mail server:
❯ nc gmail-smtp-in.l.google.com 25
220 mx.google.com ESMTP l2-20020a02a882000000b0046e8aa49d92si5630307jam.111 - gsmtp
^C
If you see 220 ... or similar, great news: the test passed!
If instead you run the command and it seems to hang:
❯ nc gmail-smtp-in.l.google.com 25
That is because there is a firewall silently blocking the connection. Bummer, you won’t be able to send email from that server.
Whew, the hard part is over. Should be smooth sailing from here on out.
Configure postfix-relay
Before I understood how email worked, I pictured there was some centralized, official email backend for the internet™, and to send an email you had to enqueue it with the official backend, which would route it to its destination mail server, kinda like the postal service.13 Err, nope. I was wrong. At its most basic level, if you want to send an email to someone at a @gmail.com address, what you do is open a direct SMTP connection to gmail.com’s mail servers–which is literally what we did in the previous step–and give it the email you want to send. I don’t even mean “you” in a strictly figurative sense like some server software is doing it on your behalf. No, I mean you can literally open a connection to gmail.com and type out the commands to deliver an email to someone.
This is why I assert that sending your own transactional email is so much simpler than people picture. We need something to accept the outgoing email from your app, reliably open a connection to the destination mail server, be that gmail.com or some other domain, then type out the email to be delivered. That is it. There is no magic. Not surprisingly, there is well established software we can leverage that does exactly that.
Steps
For the sake of example I am going to assume you are using Docker Compose.14 Add this service to your docker-compose.yml:
services:
  # …other services…

  postfix_relay:
    image: mwader/postfix-relay
    restart: unless-stopped
    environment:
      - OPENDKIM_DOMAINS=yourdomain.example
    networks:
      - postfix-net
    volumes:
      - "./data/postfix_relay/keys:/etc/opendkim/keys"
      - "./data/postfix_relay/spool:/var/spool/postfix"
Replace yourdomain.example with whatever domain you will be sending email from. Like if your email address is sfalken@wopr.example the domain would be wopr.example.
Then declare a postfix-net network elsewhere in the file:
networks:
  # ...other networks...
  postfix-net:
Start up the service to make sure it can run:
docker compose up postfix_relay
You can shut it down for now (Ctrl-C). Finally, grab the value of the generated DKIM key (which we will use in the next step):
docker compose run postfix_relay sh -c 'cat /etc/opendkim/keys/*/mail.txt'
Why mwader/postfix-relay?
I chose that particular Docker image because I liked its simplicity (essentially two files) and because it is based on the extremely mature Postfix MTA software. There are other pre-built Docker images you can use, if you want, that should be comparably easy.
Configure DNS
Ah, yes, DNS. The legendary cause of all outages. It is also one of the “details” alluded to earlier that scares people off from hosting their own email. The number of standards involved is indeed intimidating. First there was Forward-confirmed reverse DNS, then there was SPF, followed by DKIM,15 followed by DMARC.16 You would hope that later standards would obsolete earlier ones, to keep things simple. Alas, while they all cover overlapping territory, no one standard is a superset of any other, so best practice is to layer them all on top of each other.
Don’t worry, I will walk you through it. Chances are you’ve already done a basic version of these steps at least once already, following the DNS setup instructions from your email provider (the one for receiving emails).
- Log in to the DNS management dashboard17 for your domain.
-
Update the existing SPF record to include the hostname (or IP) of the server that will be sending email
Host: <whatever domain you are sending from>
Record Type:TXT
Example Value:v=spf1 mx a:yourmailserver.yourdomain.example -allIn this example we’re assuming you already had
v=spf1 mx -alland you need to adda:yourmailserver.yourdomain.example. If you’re adding an IP it looks slightly different:ip4:198.51.100.123 -
Add a TXT record with your DKIM key:
To get these values, consult the auto-generated file we printed above when you ran:
cat data/postfix_relay/keys/*/mail.txt.Host: <the host from the file> (looks like:
mail._domainkey.yourdomain.example)
Record Type:TXT
Example Value:v=DKIM1; h=sha256; k=rsa; p=<random looking key> -
Finally, add a TXT record for your DMARC policy (if one doesn’t exist):
Host:
_dmarc.<whatever domain you are sending from>
Record Type:TXT
Example Value:v=DMARC1; p=quarantine;
Every DNS provider has a slightly different UI and uses slightly different terminology (instead of “Host” maybe it is “Domain” or “Record”). Also, you may have existing DNS records and have questions about how to integrate the above changes. Rather than me trying to cover every scenario exhaustively, what you should do is copy and paste your records, the above instructions, along with your specific question into ChatGPT.
Why do we need all these SPF/DKIM/DMARC records?
If this weren’t already such a long post, perhaps I would go into detail about what security properties each standard does and does not provide and how they come together like Voltron to stop phishing (kinda) and spam (sorta).
Instead, I’ll give you the bottom line version: if you perform the ritual of setting up all these records following the prescribed steps, it will make your mail server look legitimate to other mail servers, with the reward being that email you send will be delivered to the recipient’s inbox (most of the time). If you fail to perform all the ritual steps exactly as prescribed, the punishment is that the email you send will be forever stuck in purgatory.
Configure your app
We need to configure your web framework to submit email to the postfix_relay Docker container over the SMTP protocol. In most pre-cloud-native web frameworks, this should be trivial. For sake of example I will show you how to do this with Rails. Check your web framework’s documentation for specific guidance.
Edit config/environments/production.rb. Add the following configuration:
config.action_mailer.smtp_settings = {
  address: 'postfix_relay',
}
(Where postfix_relay is the name of the service you added to docker-compose.yml)
For development, you can either repeat the same change in config/environments/development.rb (Docker all the way) or set up postfix_relay to listen on the host.18
Then update the service entry for your web app in docker-compose.yml to add the service to the same network:
services:
  # …other services…

  your_app:
    # …other configuration…
    networks:
      - default
      - postfix-net
Example Code: If you are having trouble following the steps, take a look at the code for the demo app I put together: mkropat/transactional-email-example
Restart the containers for these changes to take effect:
docker compose up -d --force-recreate
You are done setting things up! There is only one thing left to do…
Verify deliverability
There are many services out there to check if your email server is set up correctly. Search for “email deliverability test”. An advantage of such services is that the good ones will break down why the test failed and give helpful instructions for how to fix it. By all means, start with such tools.
At the end of the day though, there is no better test than trying to send an email to an address hosted at a major email provider and see what happens. And there is no provider more prominent than Gmail. So let’s try it. Going back to the Rails example, sending an email from your SSH session might look something like:
bin/rails runner 'TestMailer.test_email("your.address@gmail.com").deliver_now'
(Replace your.address@gmail.com with an actual Gmail account that you control)
- Log in to gmail.com (whatever account you sent the mail to)
- Locate the email you sent
- If it’s in the Inbox → Success! Proceed to step 3 just to double check.
- If it’s in the Spam folder → Uh oh. Proceed to step 3 to see why.
- If it’s not anywhere → Skip these steps for now, go to: Delivery Issues
- Open the email
-
Click on the More dropdown then click on Show original
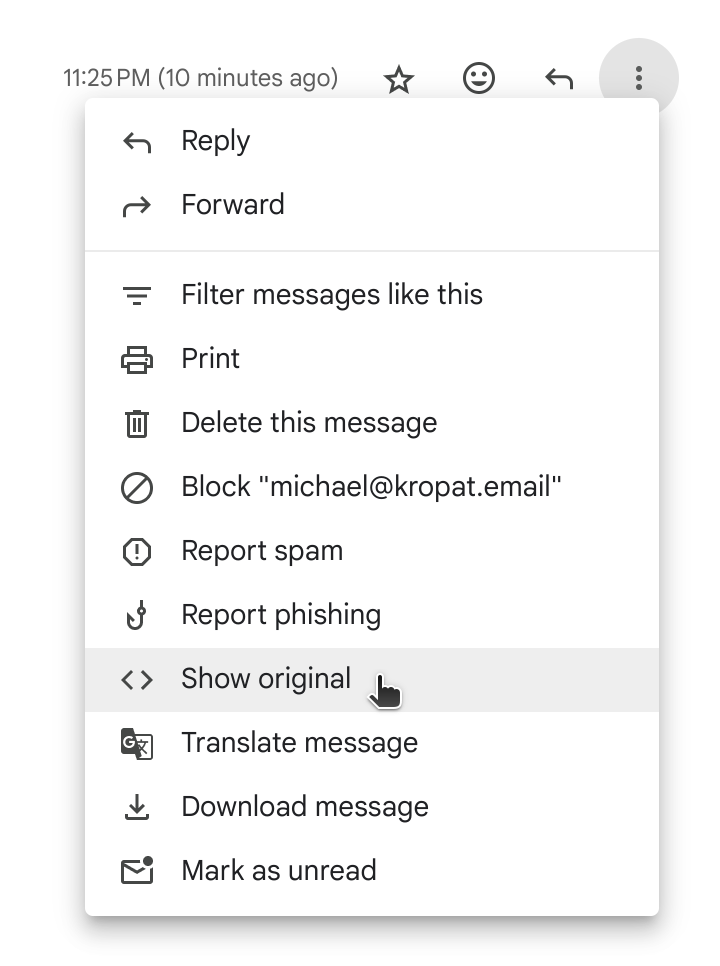
You should see something like:
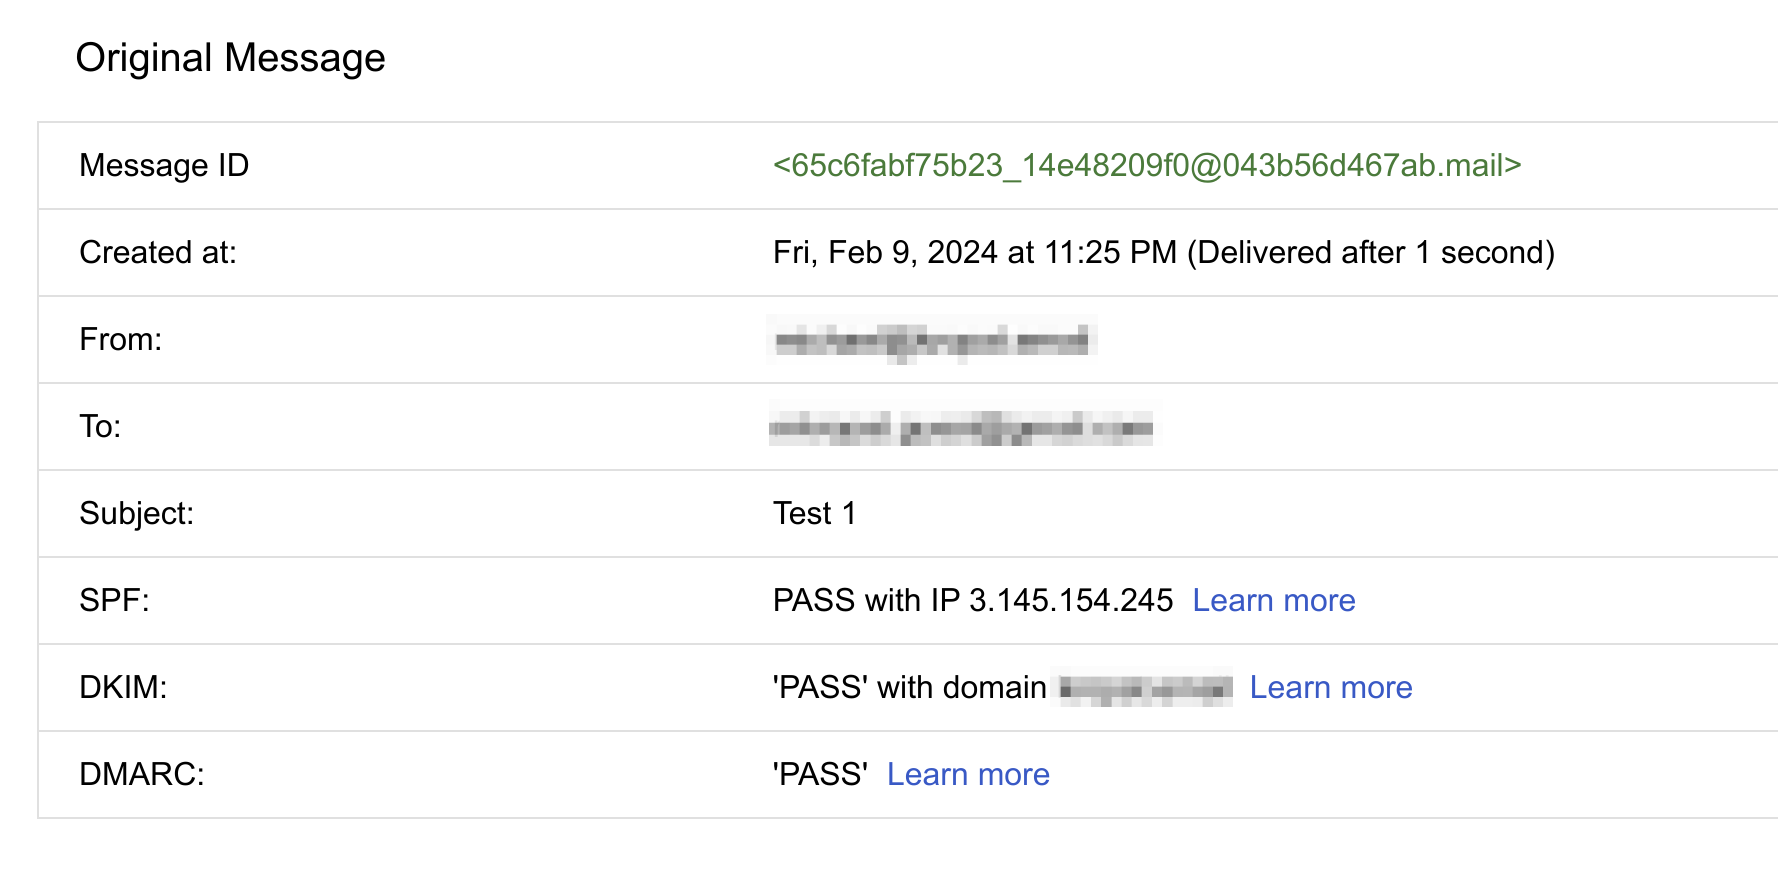
Pay special note to the results of the SPF, DKIM, and DMARC results. If they’re not all “PASS” then you have an issue you need to look into. If you scroll further down on the Gmail page you can see the actual headers that were attached to the email. If you are unsure what you are looking at, copy and paste the headers into ChatGPT and ask it to explain.
If you are unlucky, your email may have passed all the checks and still ended up in the Spam folder. Sometimes this is because test emails look “spam-y” to email providers. Once you start sending normal, legitimate looking email the problem often goes away. Especially once your server IP has established a track record of sending legitimate email that isn’t being marked as spam by an actual user.
Troubleshooting Delivery Issues
A quick note on terms:
- Deliverability – Did your email arrive in the recipients Inbox? This is what is covered by the above instructions.
- Delivery – Did your email even get handed off to the destination mail server? This is covered by the following instructions.
There are numerous reasons why your email might not be making it to the destination mail server. Regardless of the underlying cause, the first troubleshooting is the same: look at the logs for your mail server. To do this with what we have set up, run:
docker compose logs postfix_relay
If you don’t see any messages about connections (“connect from”), your app is not successfully submitting the email to the relay. Start troubleshooting there.
If you do see connection messages, take a closer look for error messages. It is likely that Gmail’s mail server is rejecting the email.
Summary
This post is on the long side because I wanted to give you enough context to appreciate what each step is for. However, looking back at the actual changes we made:
- Defined a
postfix_relayservice indocker-compose.yml - Declared a
postfix-netnetwork indocker-compose.yml - Configured 3 DNS records: SPF, DKIM and DMARC
- Updated your app to send via
postfix_relay
We can see there isn’t that much to it. Certainly not to get started.
Of course there will be additional challenges when you need to scale this solution: What are you going to do for DKIM key management? How will you efficiently address bounce emails? Etc..
Many of these scaling concerns go away (or are significantly diminished) if you were to use a transactional email service. Self-hosting is definitely not for everyone.
But maybe you’re not anticipating that kind of scale. Or maybe you have the expertise in-house to handle scaling when you need it. Transactional email is at least an order-of-magnitude less complex then full email hosting (send+receive etc.), and also not as complex as running your own marketing email infrastructure. I’m not saying you should definitely self-host your own transactional email infrastructure, but I wrote this post to help you see that it is worth considering the option.
Notes
- “Transactional email” refers to the email messages that a typical web app would send reactively: user welcome emails, password resets, log-in notifications, that kind of thing. This is in contrast to marketing emails or newsletters, which are typically kicked off as a batch process and involve a large number of recipients for what is essentially one message.
- Full disclosure: I worked at a company, Rackspace, when Mailgun was owned by Rackspace. I didn’t work on Mailgun, nor do I have any continued financial interest in either company.
- Eschewing paid or complicated tools seems to be a recent theme of the blog.
- The median customer experience with transactional email services is quite good, but I’ve heard horror stories from unlucky users. A sufficiently competent organization can self-host more reliably than the expected reliability (risk * impact) of a SaaS, despite cloud hype to the contrary. Your risk is typically higher than a SaaS’s published uptime numbers. That is one potential advantage. Another reason to self-host is because you want to learn. There are other reasons.
- It doesn’t matter too much what type of hosting so long as you have a static IP address (IPv6-only should be fine too), for reasons that will become clear in the following sections.
- Similarly, many app hosting plans offer some sort email sending service at little or no additional cost. This has basically the same trade-offs as a generic email provider, as described in the next paragraph.
- Think about it, what do you need access to to reset your password on important services? Often email is sufficient. And that’s only the most obvious way an attacker can exploit email access.
- There are multiple projects that make it easy to get started running your own entirely self-hosted email solution, however there is no way you can call running your own email server simple. I contributed to one such project called Mail-in-a-Box and there are a number of others if you search around.
- IP reputation is used beyond email. Websites use it to decide whether to give visitors from that IP extra CAPTCHAs, to let visitors make payments, or even load the site in the first place. For purposes of setting up an email server, you want to pay most attention to DNS blocklist results, since that is typically what email servers look at to decide whether a sender looks spam-y.
- If you are subscribed to a business plan with your ISP, there is a chance that SMTP is open. Or perhaps if you’re with some local co-op ISP or something like that, maybe it’s open. For everyone else? Forget about sending emails from home (at least not without going through a proxy).
- If you find that your hosting provider does block SMTP, you could try checking their documentation or submitting a support ticket to see if they have a way to get your server added to an inclusion list.
- Alternatively if netcat is not installed you can try telnet. The syntax is basically the same:
telnet gmail-smtp-in.l.google.com 25. Use the escape key sequence (Ctrl-]) followed by thequitcommand to exit. - It’s not that crazy. Domain names, DNS, and IP routing infrastructure do work like that to varying degrees of centralization.
- If you’re using something more complex, surely you can translate this example to whatever you are using.
- Really there was Domain Keys then DKIM, but we’ll just leave that detail out for simplicity as there isn’t enough room in this post to give a full history lesson.
- And those are just the standards that pertain specifically to DNS. There’s also ARC and MTA-STS, but we can ignore those for purposes of this post.
- Or for those who self-host their DNS servers, edit the zone file in your text editor.
-
To make
postfix_relaylisten on the host machine, add the following to the corresponding service definition indocker-compose.yml:ports: - "127.0.0.1:25:25"In this setup–where you run Rails on the host directly–no changes are needed in
config/environments/development.rb, since the default behavior is to submit email on localhost port 25.